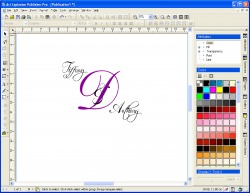
Alright, here we go! Trying to do alot of DIY projects for this wedding! I'll add them as I go along, but the first project I have done is making my own monogram. I love monograms and have wanted one from the start. So, after getting some inspiration from other DIY brides, I came up with this one:

The really cool thing about this is that I used 4 different fonts to make it! 3 alone in the names!! Really cool. I posted this on weddingbee and some of the ladies wanted to know how I made it.. well, here's the best I can do with the tutorial! :]
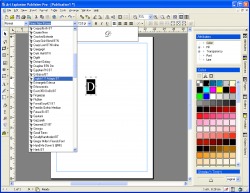
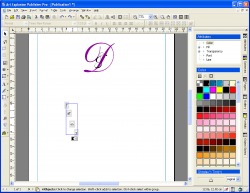
I used a program that I bought at Walmart a couple of years ago (they do still carry it though) called PublisherPro. The first thing I did was make a text box with a capital D. I changed the font to: English111 AdagioBT. I also changed the color of the D to a pretty purple.
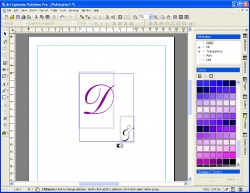
Then I made another text box for my &. The font is the same as the D. In this picture I'm showing you how there are two text boxes. I do not connect them this way. I move the & to sit inside the D.
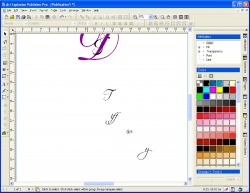
Now for our names.. I use the same technique with both names but will show you only using my name: Tiffany.
For the "T" I use the font: Monterey BT italisized (sp?) size 72
"iff" and "y": Scriptina (Bold) size 36
"an": Monterey BT size 30
Each is a different text box... Then I put them all together to make my name... make sense?
For the "T" I use the font: Monterey BT italisized (sp?) size 72
"iff" and "y": Scriptina (Bold) size 36
"an": Monterey BT size 30
Each is a different text box... Then I put them all together to make my name... make sense?
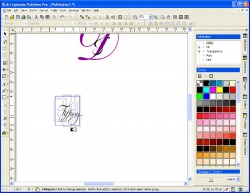
On Anthony's name I used a total of 6 text boxes. Even though I used the same font for the "th", they were spread apart too far, so I made different text boxes so I could control how close/far apart they were.
For the date, I used 2 different fonts. For Feb. I used 18thCentury and for the numbers I used again Monterey BT. Then I changed both to a light color pink.
For the date, I used 2 different fonts. For Feb. I used 18thCentury and for the numbers I used again Monterey BT. Then I changed both to a light color pink.

You don't really need a fancy program to do this. You just need a program that allows you different text boxes that can overlap and squeeze together.
If you like this collection of fonts/layout/and overall look of the monogram and desire to have your monogram look the same, but maybe, cannot make your own/don't have the time.. (lots of run ons, huh? hehe) I would be more than happy to make a monogram for you for a lovely donation of any amount. It took me litterally about 10 to 15 minutes to make and I had alot of fun! I can save it in PDF format and you may use on any and all wedding related products you choose!! Just drop me an email at: [email protected].
If you like this collection of fonts/layout/and overall look of the monogram and desire to have your monogram look the same, but maybe, cannot make your own/don't have the time.. (lots of run ons, huh? hehe) I would be more than happy to make a monogram for you for a lovely donation of any amount. It took me litterally about 10 to 15 minutes to make and I had alot of fun! I can save it in PDF format and you may use on any and all wedding related products you choose!! Just drop me an email at: [email protected].
The Guestbook
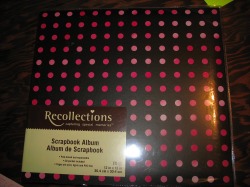
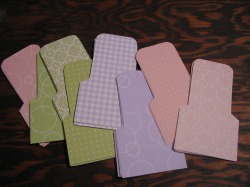
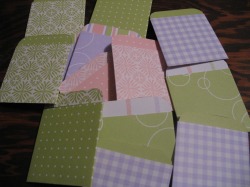
I picked up this scrapbook at Michael's for $6.99! The size is 12x12 and it's black with two shades of pink polka dots! I love it!
I found this questbook idea from Thao (her blog link is under Inspiration page) and I just had to make one like her! It's not finished yet, but I'll show you the beginning of what I have...
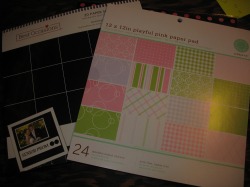
I bought my paper from Walmart.. it's black 12x12 sheet for $3.50 and then the Martha Stewart "playful pink paper pad" cardstock for $8.00.
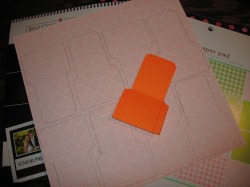
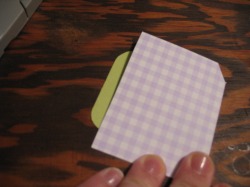
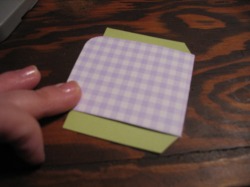
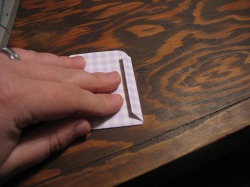
I followed Thao's instructions for making the pocket. I used an index card for my template. I then traced my templete on my papers. I got 8 to each 12x12 sheet. I then cut them out. :]
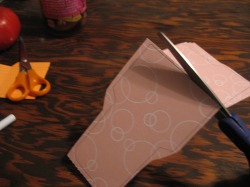
I took the larger end and folded it up toward the smaller end without connected the edges. Then I flipped it over and folded my laps over to created the pocket... I hope I'm explaining this ok.. =/ Oh, just look at the pictures.. hehe
My Map!
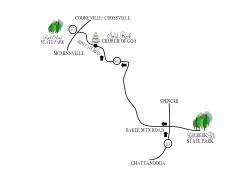
So my map is pretty simple.. I mean, come on! We're getting married in no mans land and we're having our reception at the church, so there's really nothing to it.. we just have alot of people coming at least an hour and a half away. So that's the reason for the map. I just love love love mine!! :] We have a state park at each end so I added some trees.. hehe and then there is a wedding cake at the church "dot".. soo cute!
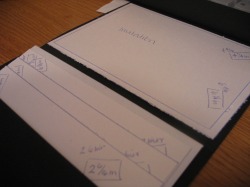
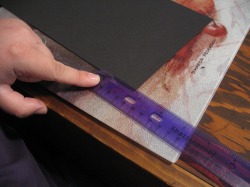
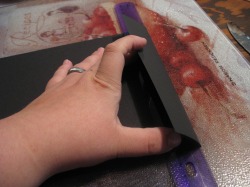
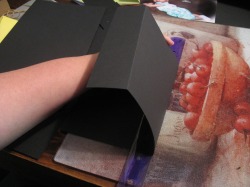
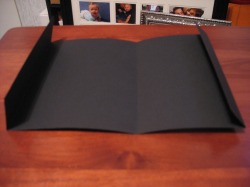
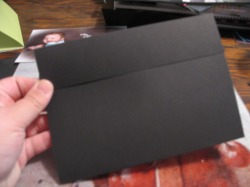
So I was walking through Hobby Lobby the other night and I was bored.. yep.. so I went looking through the paper and saw black 12 x 12 cardstock 20 sheets for $3.99. So I bought some and decided to try my hand at the pocketfold.. here's what I did...
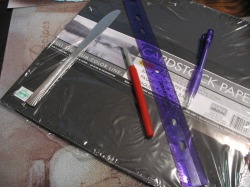
My materials are black cardstock 12x12, pen, ruler, exacto knife, and a butter knife to score.
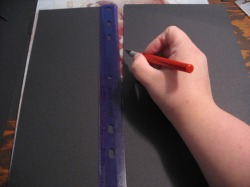

So I took my ruler, measured 7in and cut my paper to be 7x12. I'll use the remaining for programs for the ceremony.. :]
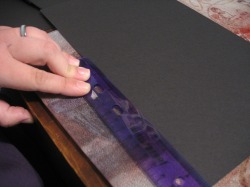
Ok, so I'm embarrassed to say that I do not know how to read a ruler.. I know, terrible.. but I asked my Dad what my measurements were. So I will include my way and his way.. hehe
First I measured 1 11/16.. which I say is 1 1/2 + 3 lines.. hehe
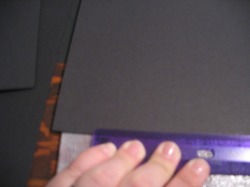
Then from there I measured in 5in, then 4in, and last 1 5/16.. which I say is 1 and 5 lines. I then placed my ruler across the page at each measurement and using my butter knife (the top) I scored my folds. And viola! My pocketfold!
First I measured 1 11/16.. which I say is 1 1/2 + 3 lines.. hehe
Then from there I measured in 5in, then 4in, and last 1 5/16.. which I say is 1 and 5 lines. I then placed my ruler across the page at each measurement and using my butter knife (the top) I scored my folds. And viola! My pocketfold!
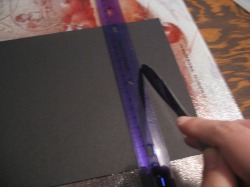
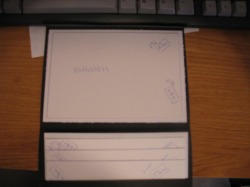
Ok, so I was working it out today on getting my mat, invite, and all insert measurements ready to start printing.. So, here's what I came up with:
I wanted a border around the mat, so my mat size is 4 5/8in x 6 5/8in
the invite size is 4 1/4in x 6 1/4in
Now, for my inserts, I'm trying to keep my cost down as much as I can.. so for my RSVP I've decided to use envelopes you can buy at walmart that come in bulk.. it has a pretty blue lining. According to the box (it's a blue box) they're 20lbs, No. 6 3/4 and their size is 3 5/8in x 6 1/2in. So the insert is 3 7/16in x 6 1/4in, my next insert is 2 7/8in x 6 1/4in, and the last insert is 2 6/16in x 6 1/4in. I followed my Dad's directions on reading a ruler.. I hope all of that is right.. :]